
Manage Users and Access – GOCare OutageIQ
Quick Summary
OutageIQ uses a role-based access model to control how users interact with the system. Admin users are responsible for managing user accounts, assigning roles, and ensuring appropriate access levels across their organization.
This article provides an overview of OutageIQ access levels and walks through the process of creating and managing users.
To access OutageIQ, log in at https://outageiq.gocare.io
OutageIQ Access Levels
OutageIQ uses a role-based access model with three distinct levels. Each role builds on the permissions of the previous level.
Viewer
Access Type: Read-only
Viewers can monitor system information but cannot take action.
Capabilities:
View dashboards
View outage and event information
Operator
Access Type: Operational
Operators have Viewer access plus the ability to perform manual outage and maintenance actions.
Manual actions Operators can perform include:
OD – Outage Declare
OU – Outage Update
OC – Outage Clear
MD – Maintenance Declare
MU – Maintenance Update
MC – Maintenance Clear
MA - Maintenance Adjust
Admin
Access Type: Administrative
Admins manage users and permissions within OutageIQ.
Capabilities:
All Operator permissions
Create, edit, and manage users
Assign roles and customize permissions
Username and Password Requirements
Username
Usernames are created by Admin users
Usernames are set to the user’s email address
Password Management
Admins are responsible for initial password creation
Admins handle password resets if a user forgets their password
Password Requirements
Passwords must meet the following criteria:
Minimum length of 12 characters
At least one uppercase letter (A–Z)
At least one lowercase letter (a–z)
At least one digit (0–9)
At least one special character from the list below:
! @ # $ % ^ & * ( ) , . ? " : { } | < > - _ = + [ ] \ ; ' ~ `
How to Create a User (Admin Only)
Admins can create users directly within the OutageIQ application.
Step 1: Navigate to User Management
From the left navigation pane, select Admin
Click Create User

Step 2: Enter User Information
In the Create New User dialog, complete the following fields:
Email
Password
Confirm Password
Full Name
Role
Tenants
Step 3: Assign Role and Permissions
Select a standard role (Viewer, Operator, or Admin)
Optionally customize permissions for the user
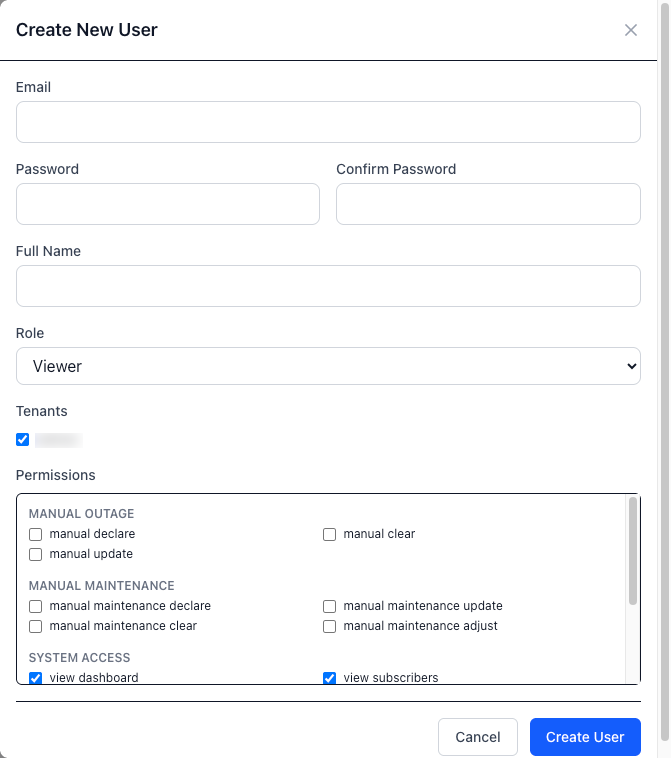
Example:
Assign the Operator role
Grant additional access such as User Management, if needed
This allows organizations to tailor access without granting full Admin privileges.
Step 4: Create the User
Review all entered information and selected permissions
Click Create User to complete the process
The new user will now appear in the User Management list.
User Management Actions
In the User Management list, each user account includes a set of action icons that allow Admins to manage existing users.

Edit User Profile
The blue pen icon allows Admins to edit an existing user’s profile. This includes updating the user’s name, role, or assigned permissions.
Reset User Password
The yellow key icon allows Admins to reset a user’s password. This is typically used when a user forgets their password or requires a forced reset.
Delete User
The red trashcan icon allows Admins to permanently delete a user from OutageIQ.