
Declaring an Outage – GOCare OutageIQ
Quick Summary
Declaring an outage in OutageIQ allows you to notify subscribers when service is disrupted. You can declare outages using manual entry or a CSV file, and OutageIQ will automatically group impacted subscribers and prepare the event for processing.
Introduction
Outages can occur for many reasons; equipment failure, upstream provider issues, or localized events. When they do, your subscribers need timely, accurate communication.
OutageIQ gives operators a consistent way to declare outages when automatic detection is unavailable, incomplete, or when you need to proactively communicate about an event. Once an outage is declared, OutageIQ:
Identifies which subscribers are affected
Groups them into a single outage event
Updates subscriber statuses
Prepares the event for customer notifications according to your configured rules
Declaring an Outage with Manual Entry
Manual entry is best for small-scale outages affecting one or a few subscribers. It allows you to add subscribers directly without building a file.
When you declare an outage using manual entry, you will provide:
The affected subscriber’s account ID
Optional information such as location or equipment context
An optional internal note describing the outage
OutageIQ uses this information to attach the subscriber to an outage event and mark them as impacted. After submission, the outage is queued for processing, and the subscriber’s status is updated to reflect the outage.
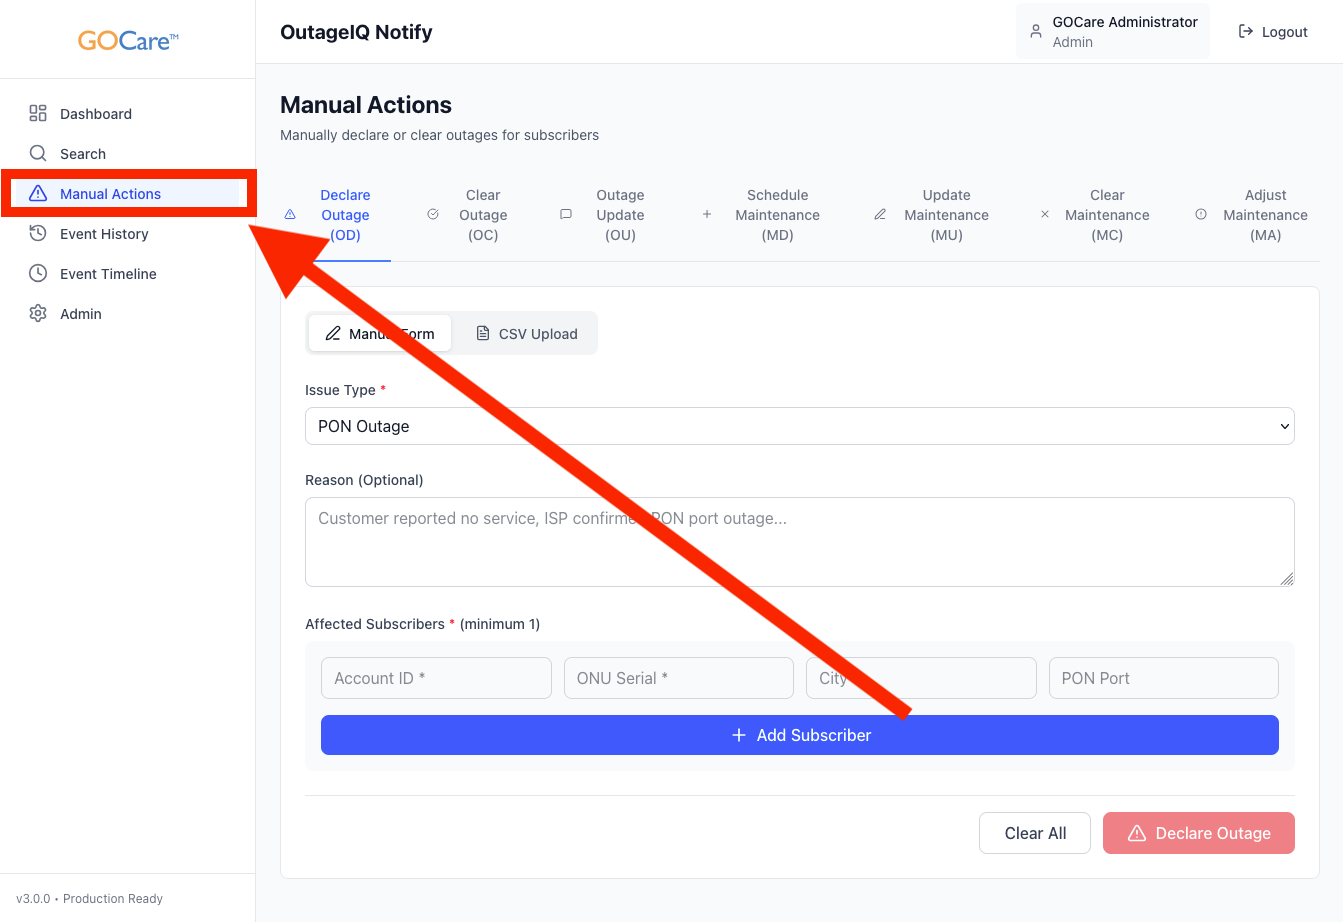
Select Manual Actions from the OutageIQ sidebar.

The page will default to the manual outage declaration page.
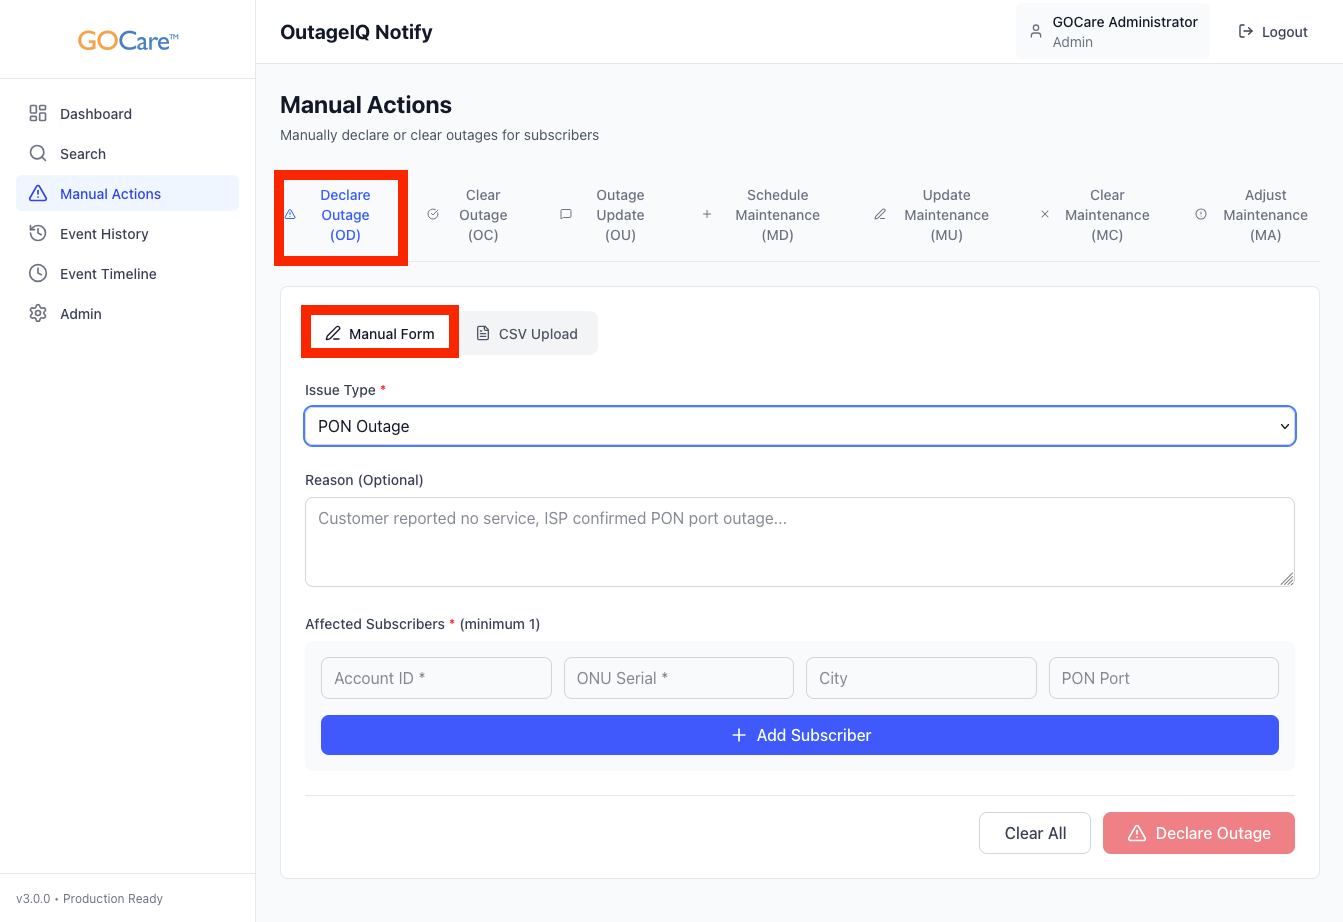
Select the issue type from the dropdown menu. The available options are PON Outage, Fiber Cut, Equipment Failure, or Other.
Provide a reason for the outage (optional)
List the affected subscribers. A minimum of 1 subscriber must be listed with their Account ID. ONU Serial, City, and PON Port are optional fields however they can be helpful for data consistency and accuracy.
Click "+ Add Subscriber" to add the subscriber to the list.
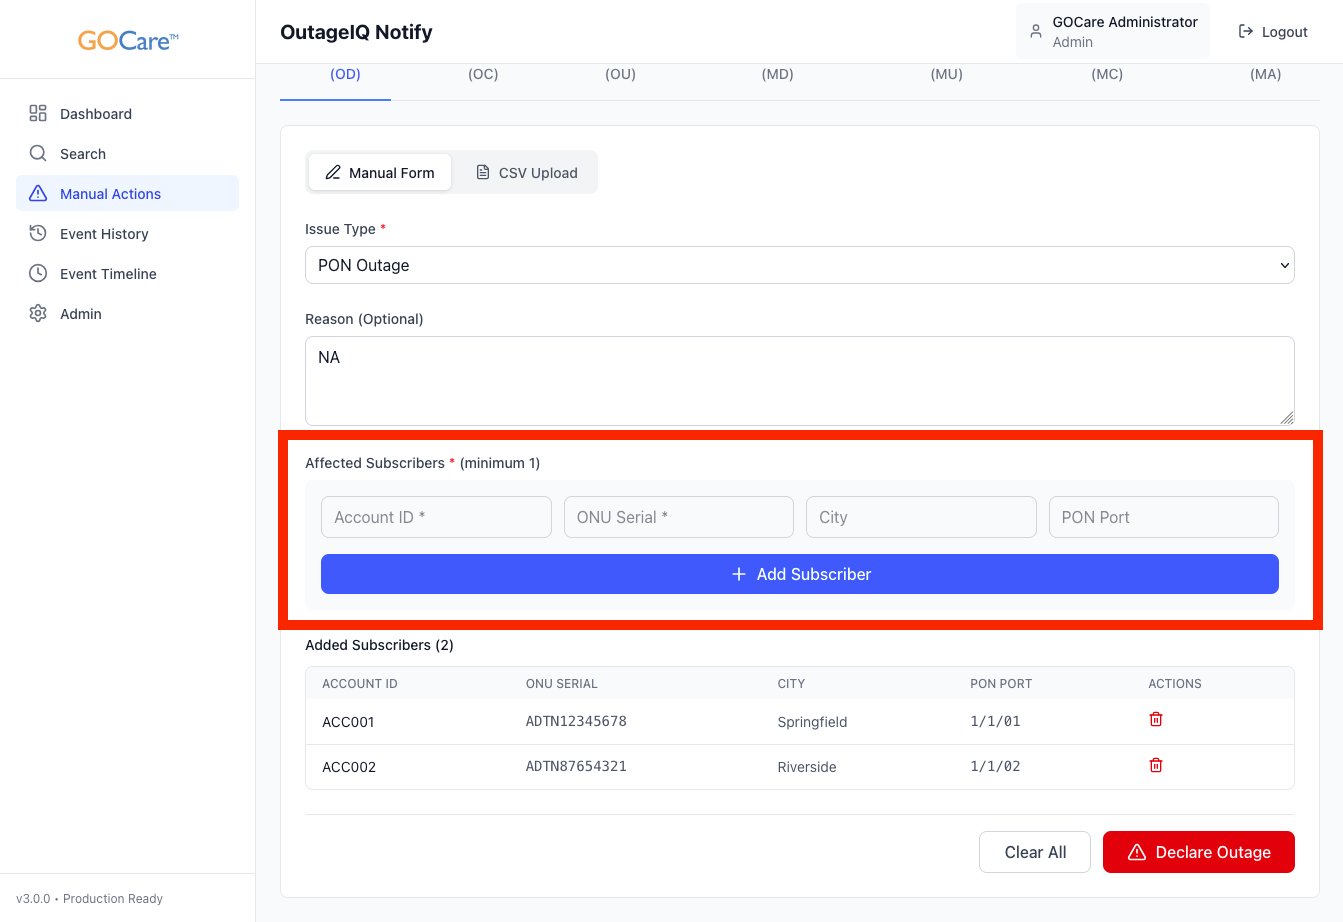
Once all affected subscribers have been added, select "Declare Outage" from the bottom right corner.
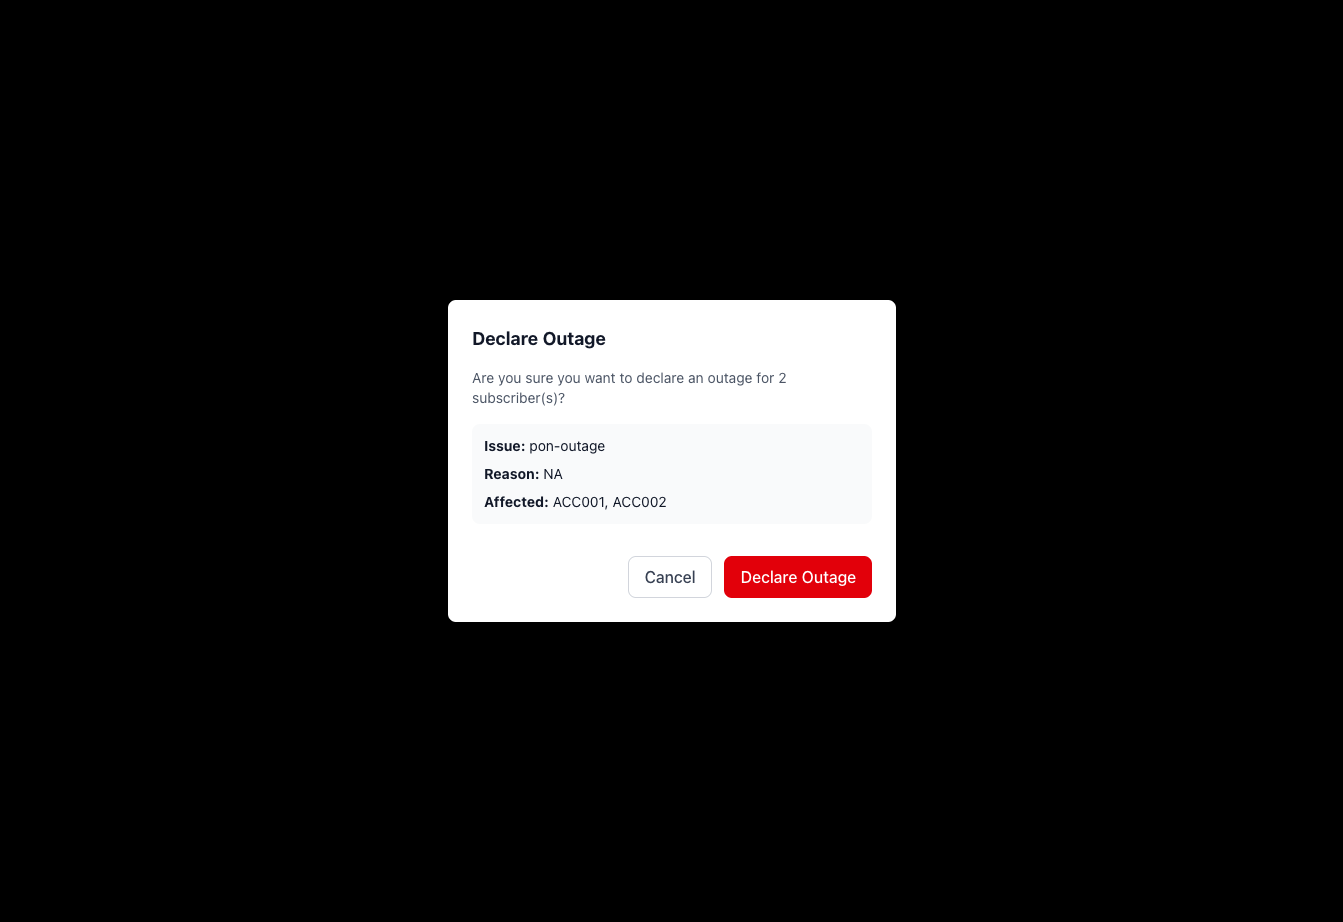
The system will ask to confirm the content you have entered. If everything looks correct, select "Declare Outage"
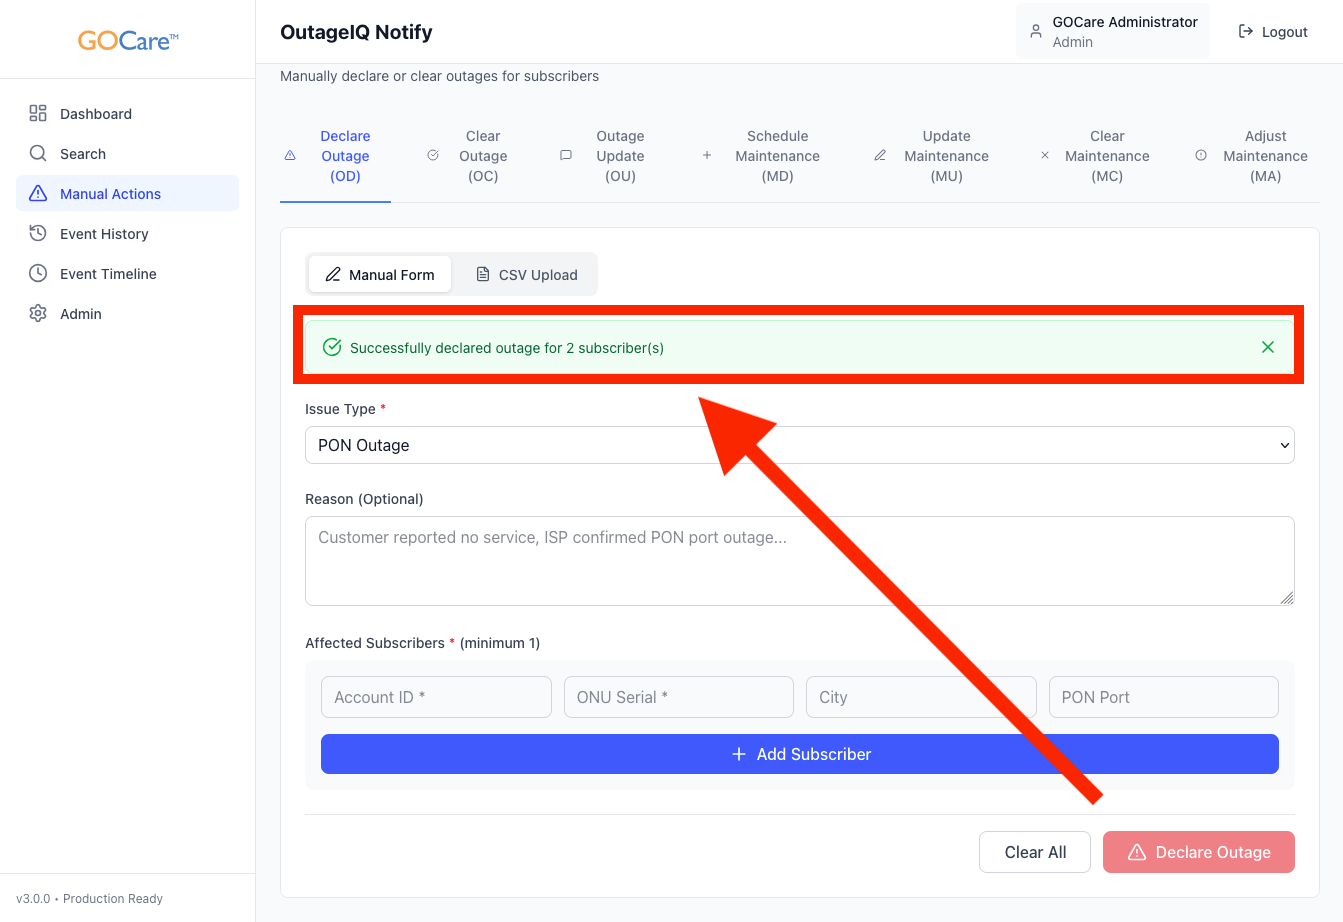
A green success bar will indicate that the outage has been declared.
💡Tip: Use manual entry when only a handful of subscribers are affected. For PON-level or large-area outages, use a CSV upload instead for better consistency and control.
Declaring an Outage with CSV Upload
CSV upload is the recommended method for declaring outages that affect many subscribers at once. This is especially useful for fiber segment outages, upstream failures, or other large-scale events.
Select Manual Actions from the OutageIQ sidebar.
Select "CSV Upload" under the Declare Outage (OD) tab.
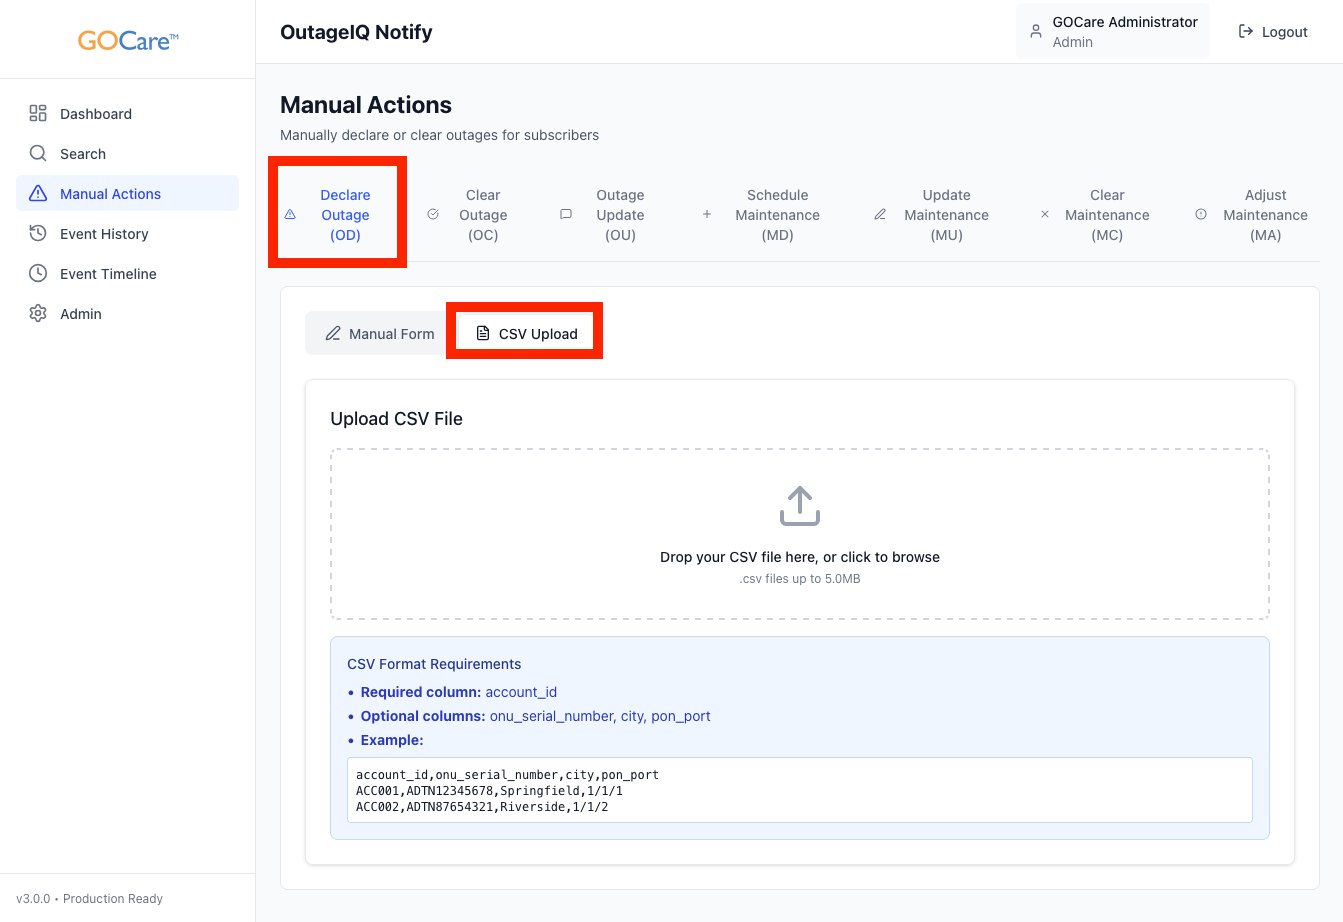
Upload your CSV file.
OutageIQ requires a specifically formatted CSV file and will not produce proper declarations without properly formatted data.
The CSV must contain the following columns without variation:
| | | |
Only the “account_id” column is required to declare an outage; however, the remaining fields are strongly encouraged for improved data consistency and service accuracy.
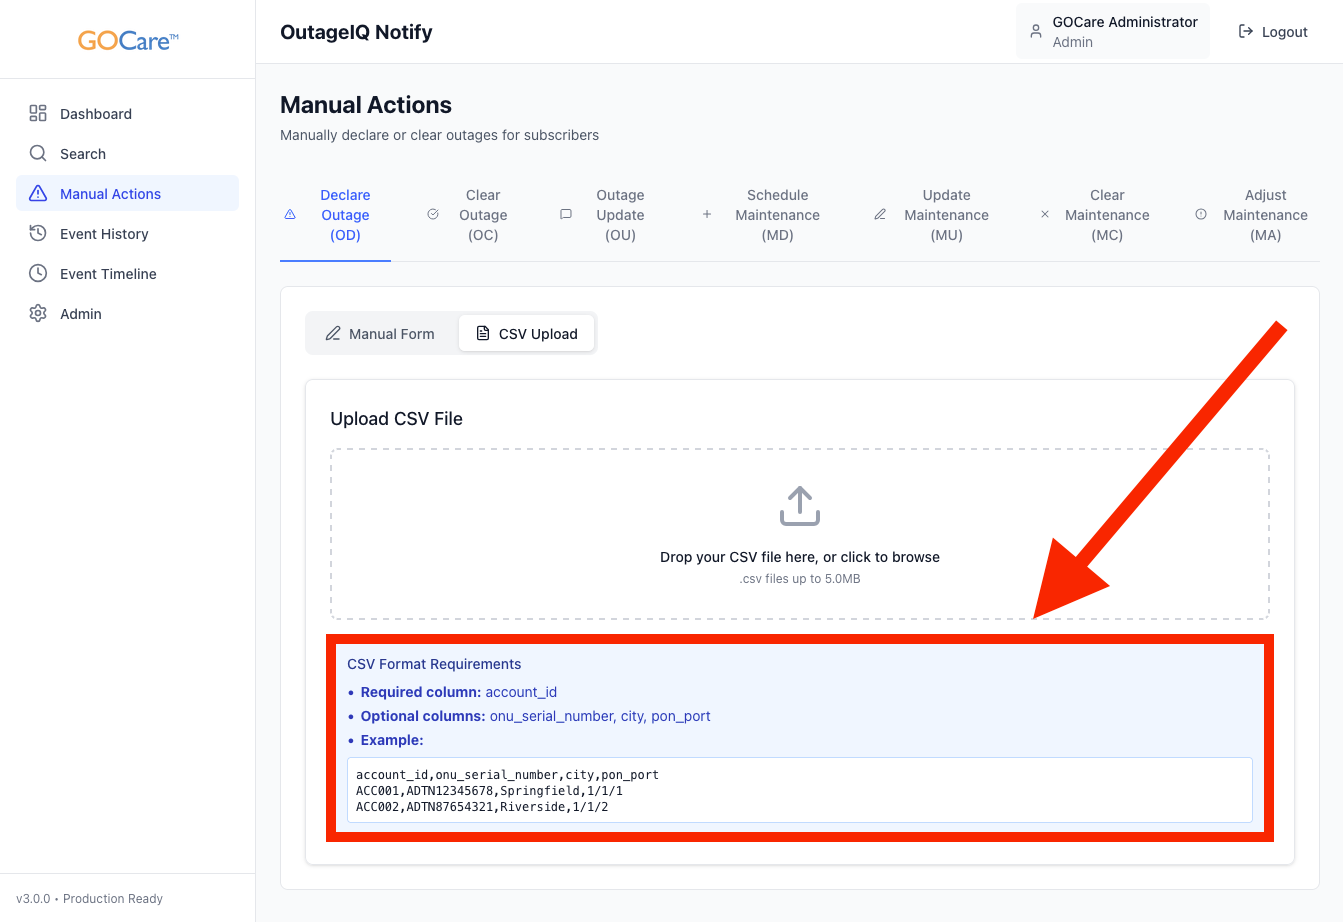
These formatting requirements, along with an example file, appear at the bottom of the interface. You may copy and paste the example into Microsoft Excel or Google Sheets, or download a template from the bottom of this article.
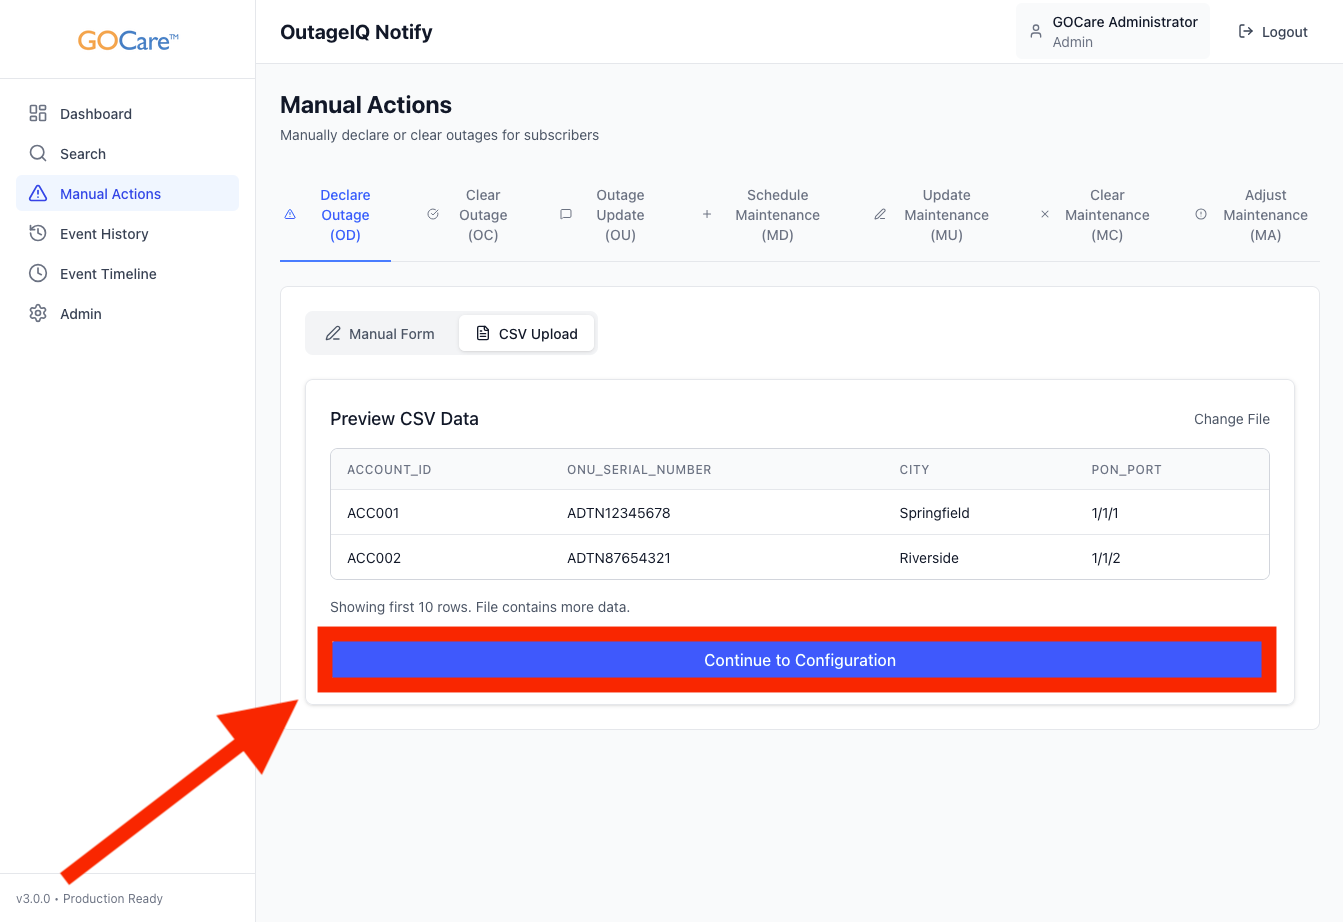
After the CSV has been uploaded, OutageIQ will display a preview of the CSV Data. Verify the preview is correct, and select "Continue to Configuration."
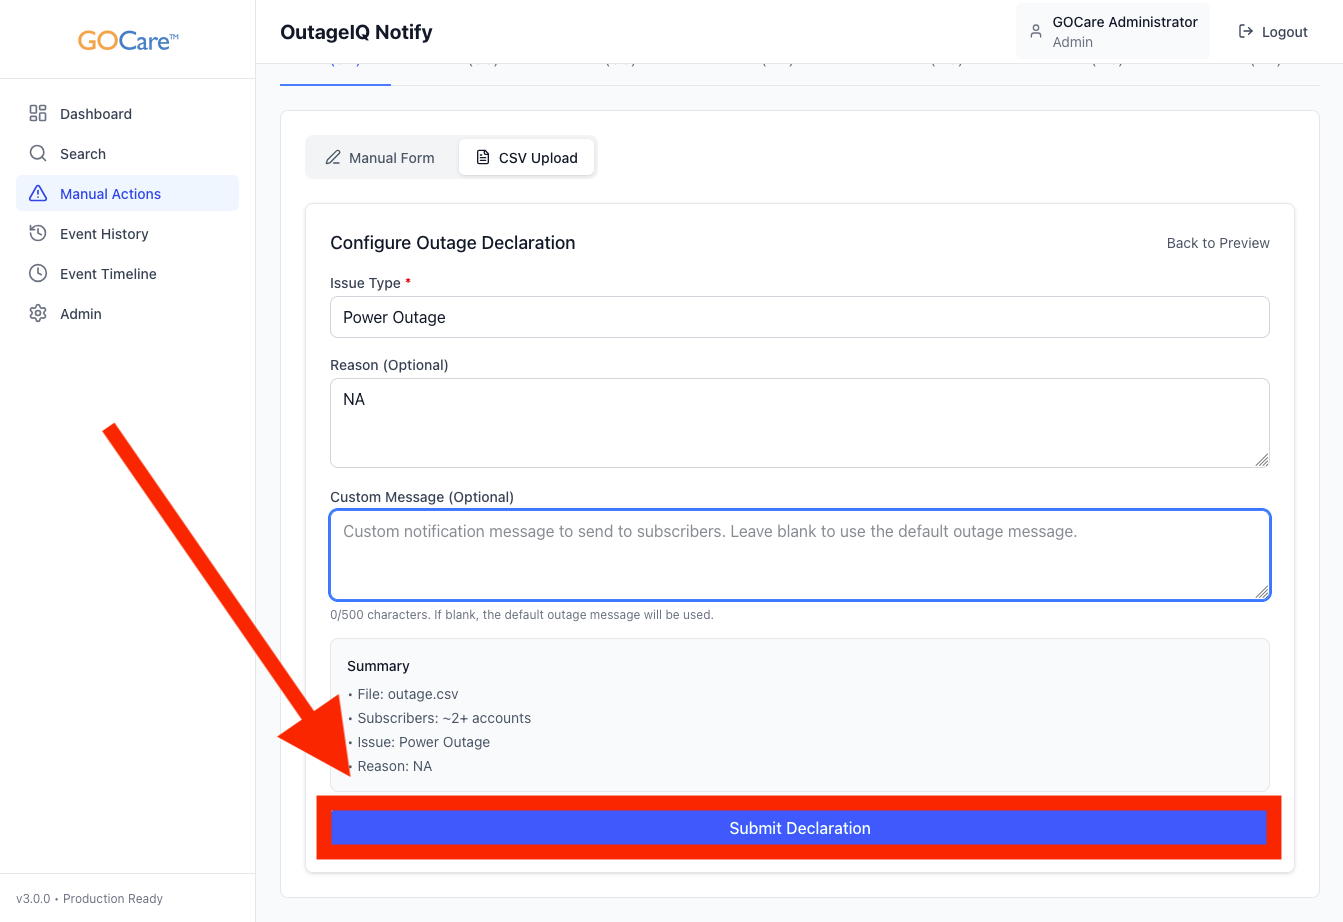
Enter the issue type. Unlike manual declarations, this field allows you to type a custom issue rather than selecting from a dropdown.
Provide a reason for the outage (optional).
A default outage message is configured during deployment; however, you may provide a custom message for this notification. If the custom message is left blank, the system default will be used.
After you have verified all information is correct, select Submit Declaration.
OutageIQ validates the CSV and uses all accounts in the file to create a single outage group. All subsequent updates and clears will apply to that entire group.
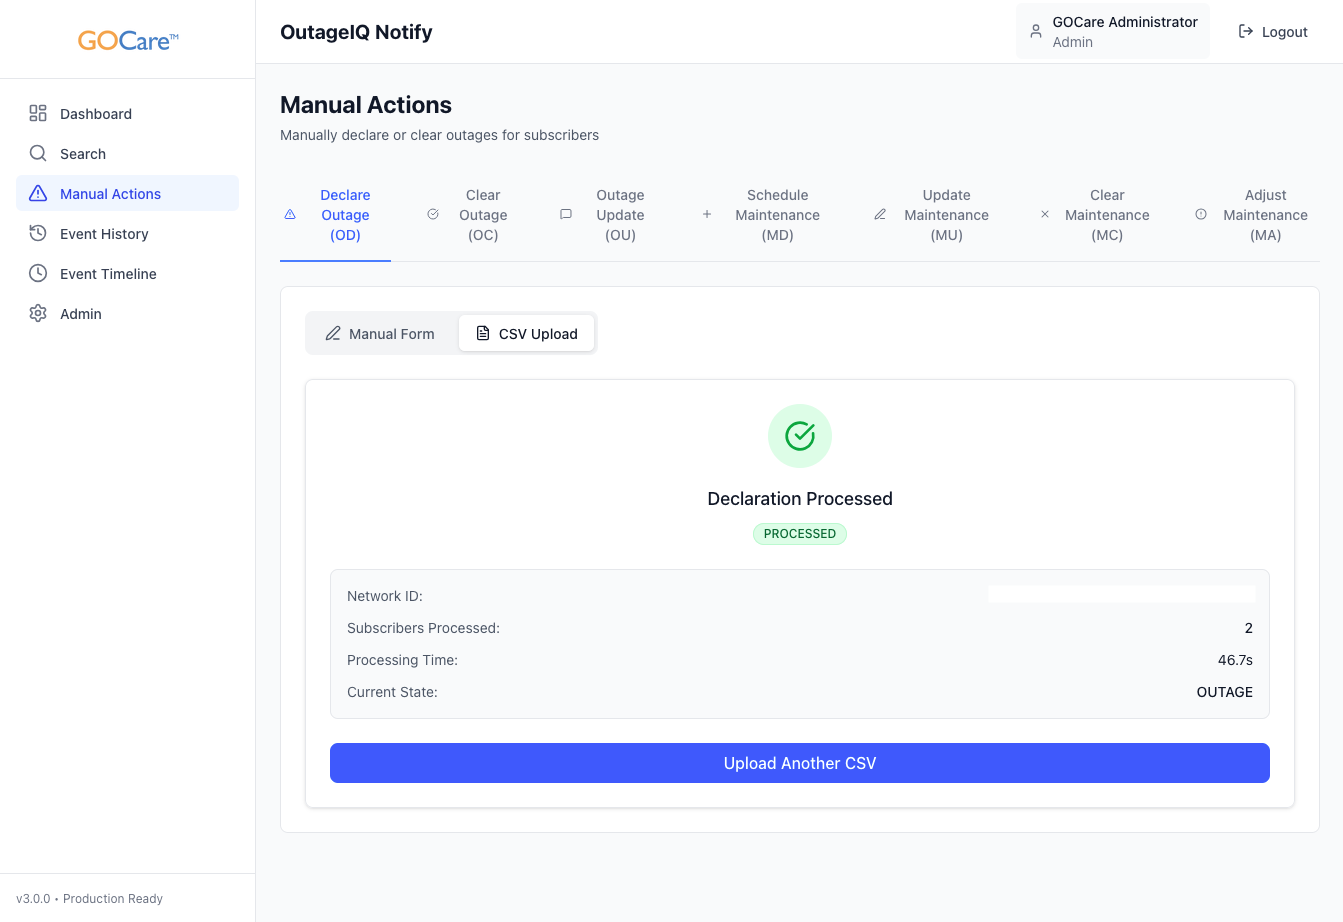
You do not need to stay on this screen after submission. The event will continue processing in the background and appear in the Event Timeline and Event History once it has been handled.
ℹ️ Note: Subscribers included in the same CSV file are treated as part of the same outage group. If you are managing multiple unrelated outages, create and upload separate CSV files for each one.
Automated Outage Declarations (Webhook Events)
In addition to manual and CSV-based declarations, OutageIQ can automatically declare outages when network monitoring systems detect a service disruption. These systems send webhook notifications directly into OutageIQ, which creates an outage event without operator intervention.
When a webhook-based outage is received:
• OutageIQ validates the webhook data
• The affected subscribers are automatically grouped into an outage event
• Their subscriber status is updated to reflect an active outage
• The outage appears in the dashboard, Event Timeline, and Event History
• Notification timing follows the organization’s configured rules
What Happens After You Declare an Outage
Once you submit an outage declaration, OutageIQ follows a consistent sequence:
Validates the subscriber identifiers you provided
Creates a shared group identifier for the outage
Updates the internal state of each subscriber to indicate an active outage
Prepares the event for outbound notification according to your organization’s timing and quiet-window settings
Records the event in both the Event Timeline and Event History for future reference
From there, operators can:
Monitor the outage in the Event Timeline
Search for individual subscribers and see their current outage status
Send outage updates as the situation changes
Clear the outage when service has been restored
ℹ️ Note: Subscriber state is updated first, and then notifications are scheduled. This state-first design helps ensure customers receive messages that accurately match their current service status.
Best Practices
To get the most value and reliability from OutageIQ outage declarations:
Only use manual entry for very small sets of subscribers.
Use CSV upload for PON-level or area-wide outages so all affected subscribers are grouped consistently.
Double-check your CSV file before uploading to avoid mixing unrelated outages into a single group.
Include optional fields in your CSV template whenever possible. This improves searching, reporting, and support workflows.
Coordinate with your network and customer service teams so everyone understands how and when outages are declared in OutageIQ.
💡 Tip: Establish internal guidelines for what qualifies as a “minor” versus “major” outage and which method (manual vs. CSV) should be used in each case. This keeps your use of OutageIQ consistent across teams.